
Cementing a Legacy
- Market Coordinator

- Jul 18, 2018
- 5 min read
Updated: Jul 20, 2018
The other day, Toni in the warehouse came by and dropped a present on my desk: a cementing top plug sliced in half. I said something like "hey, this is great, I'm always trying to see the insides of different parts." She thought I was being snarky with her and tossed me a death stare, and I had to be like "no, I was totally serious about that." Clearly she hasn't been reading any of my recent posts.
Here it is:

With that, I thought it was as good of a time as any to learn something about primary cementing. Obviously, it's a pretty central part of what we're doing here at Summit Sales & Equipment, with many of our signature products and services related to that process in one way or another. To be completely honest, I probably should've written this post earlier (don't worry, I did make the effort to learn a little bit about it when I started in the name of doing my job, I'm not going from total zero here).
If you're a lot smarter than me about it, here's a really well-done slideshow on the topic that's more on an an engineer's level, right down to the finer points of cement composition. Fascinating stuff even if you don't entirely understand all of it. Rigzone also has sort of a more polished version of what I'm attempting posted. Obviously, I'm doing remedial stuff here, but never say I don't take care of a wide audience. I'm actually going to borrow a couple visual aids from Mr. James A. Craig (who put the slideshow together), hopefully that's okay with him.
Let's start with a quick overview diagram.
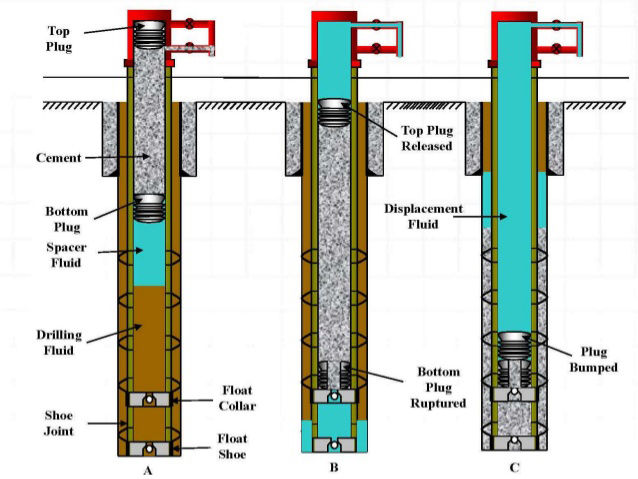
Up on the surface, not shown particularly well in this diagram, you need a cementing head to manage all of the stuff we're putting down the hole, the stuff itself (as well as the mixing equipment needed to make it), as well as some pumping horsepower to get it there. You know we love our pumps around here. The hole, at this point, consists of a casing (olive green in the diagram), (hopefully) centered within the wellbore.
Drilling fluid (often called "mud," and don't ask how long it took me to figure out that people didn't mean, like, actual mud) and cement don't play well together, so that's where that spacer fluid comes in. A lot of times, the spacer fluid can just be regular old water, in cases where the mud and cement are both water-based. The wipers down the sides of both the top and bottom plugs are also there to prevent mixing.
The float collar and float shoe serve important purposes as well, because among the biggest things you definitely don't want happening through this process is stuff coming back up on you, and they offer check valves to help make sure that doesn't happen. Both parts also play important roles in centering the casing and moderating the casing string (which is, essentially, a catchall term for this sequence of different things being fired down the hole).
Here are some shoes in our warehouse...I'll make a deal with you and refrain from pointing out that we have all of this stuff (not to mention the whole "specializing in the fabrication of cement pumping trucks that we've watched go up on this very blog, as well as repairing and refurbishing the cement and mud pumps themselves" thing) every single time if you promise to listen to me this first time. We're here if you need us.

And here's our valve friend.

Another thing you definitely do not want is a crooked casing, and if we're going to be cementing that sucker in place, it's pretty important to get it as straight as possible the first time. The good news is that we have a nifty little device called a centralizer to help out with that (although not labeled, they're represented by the black arcs going down the outside of the casing above).
Hang on...there's been a picture of a couple centralizers sitting in my download folder since before I started working here, seriously. Lauren, my predecessor, put it there knowing that (at least) nine months later, I'd be writing this post, so I have to use it.

The cuff parts go around the casing, the bow parts rest against the side of the hole to keep the thing in the middle. Pretty cool, right?
With some of those basics established, let's move on to the actual process, which of course includes the plugs that started this whole mess. Here are some bottom and top plugs - they actually look pretty similar, but there is one major difference, as we'll see shortly. It's a big enough and not immediately obvious enough difference that you'll often see the bottom ones colored red and the top ones in black so that you don't mix them up. Mixing them up would be very bad, I imagine.

The bottom plug goes down first (makes sense, right?) once you have any spacer fluid you might be using in, and it's followed by your expertly-engineered cement slurry. Once all of your cement is in, the top plug follows.
This next part is where it gets really fun for me because, as regular readers know, I geek out over the genius behind so many of the devices and tools in this industry.
So that bottom plug heads downhole until it hits the float collar. Then, the pressure from the oncoming cement forces a thin, rubber diaphragm on top of the bottom plug to rupture, allowing the cement through - which is possible because the bottom plug is essentially hollow.
Unfortunately I couldn't find a good cross-section of a bottom plug on the internet, and I didn't ask, but they probably wont let me saw one of ours in half. But here's a diagram from the Rigzone link above side by side with that top plug Toni gave me, hopefully that's good enough.

That top plug, of course, is trailing the play and is being forced downward through the pumping of more drilling fluid. It keeps going and crucially, pushing the cement ahead of it through the bottom plug until the plugs meet. The cement, meanwhile, arrives at the bottom of the casing string. With nowhere else to go, it's forced to the outside of the casing, in the space between the casing and the larger wellbore, called the annulus.
So basically, you let that set and bam, you have a vital and mandatory layer of protection between your well and the groundwater outside. Then you can drill right down the middle and get to work on extracting that sweet, sweet energy that keeps my computer running so I can write these super awesome posts, among other things I'm sure.
Hope you learned something, and if you didn't, I hope my idiocy was at least entertaining. Stay tuned for some future post where we take a closer look at what's happening on the surface during this process.


Comments